Get Started Guide
Getting Started with SaaSReady
Welcome to the SaaSReady setup tutorial. This guide will help you set up the SaaSReady template on your local machine. By the end of this tutorial, you will have the template running locally. Let's get started!
There are two options: run the setup or install manualy.
Quick Installation via Setup

Prerequisites
Before you begin, ensure you have the following installed on your system:
- Node.js
- Docker
Step-by-step setup
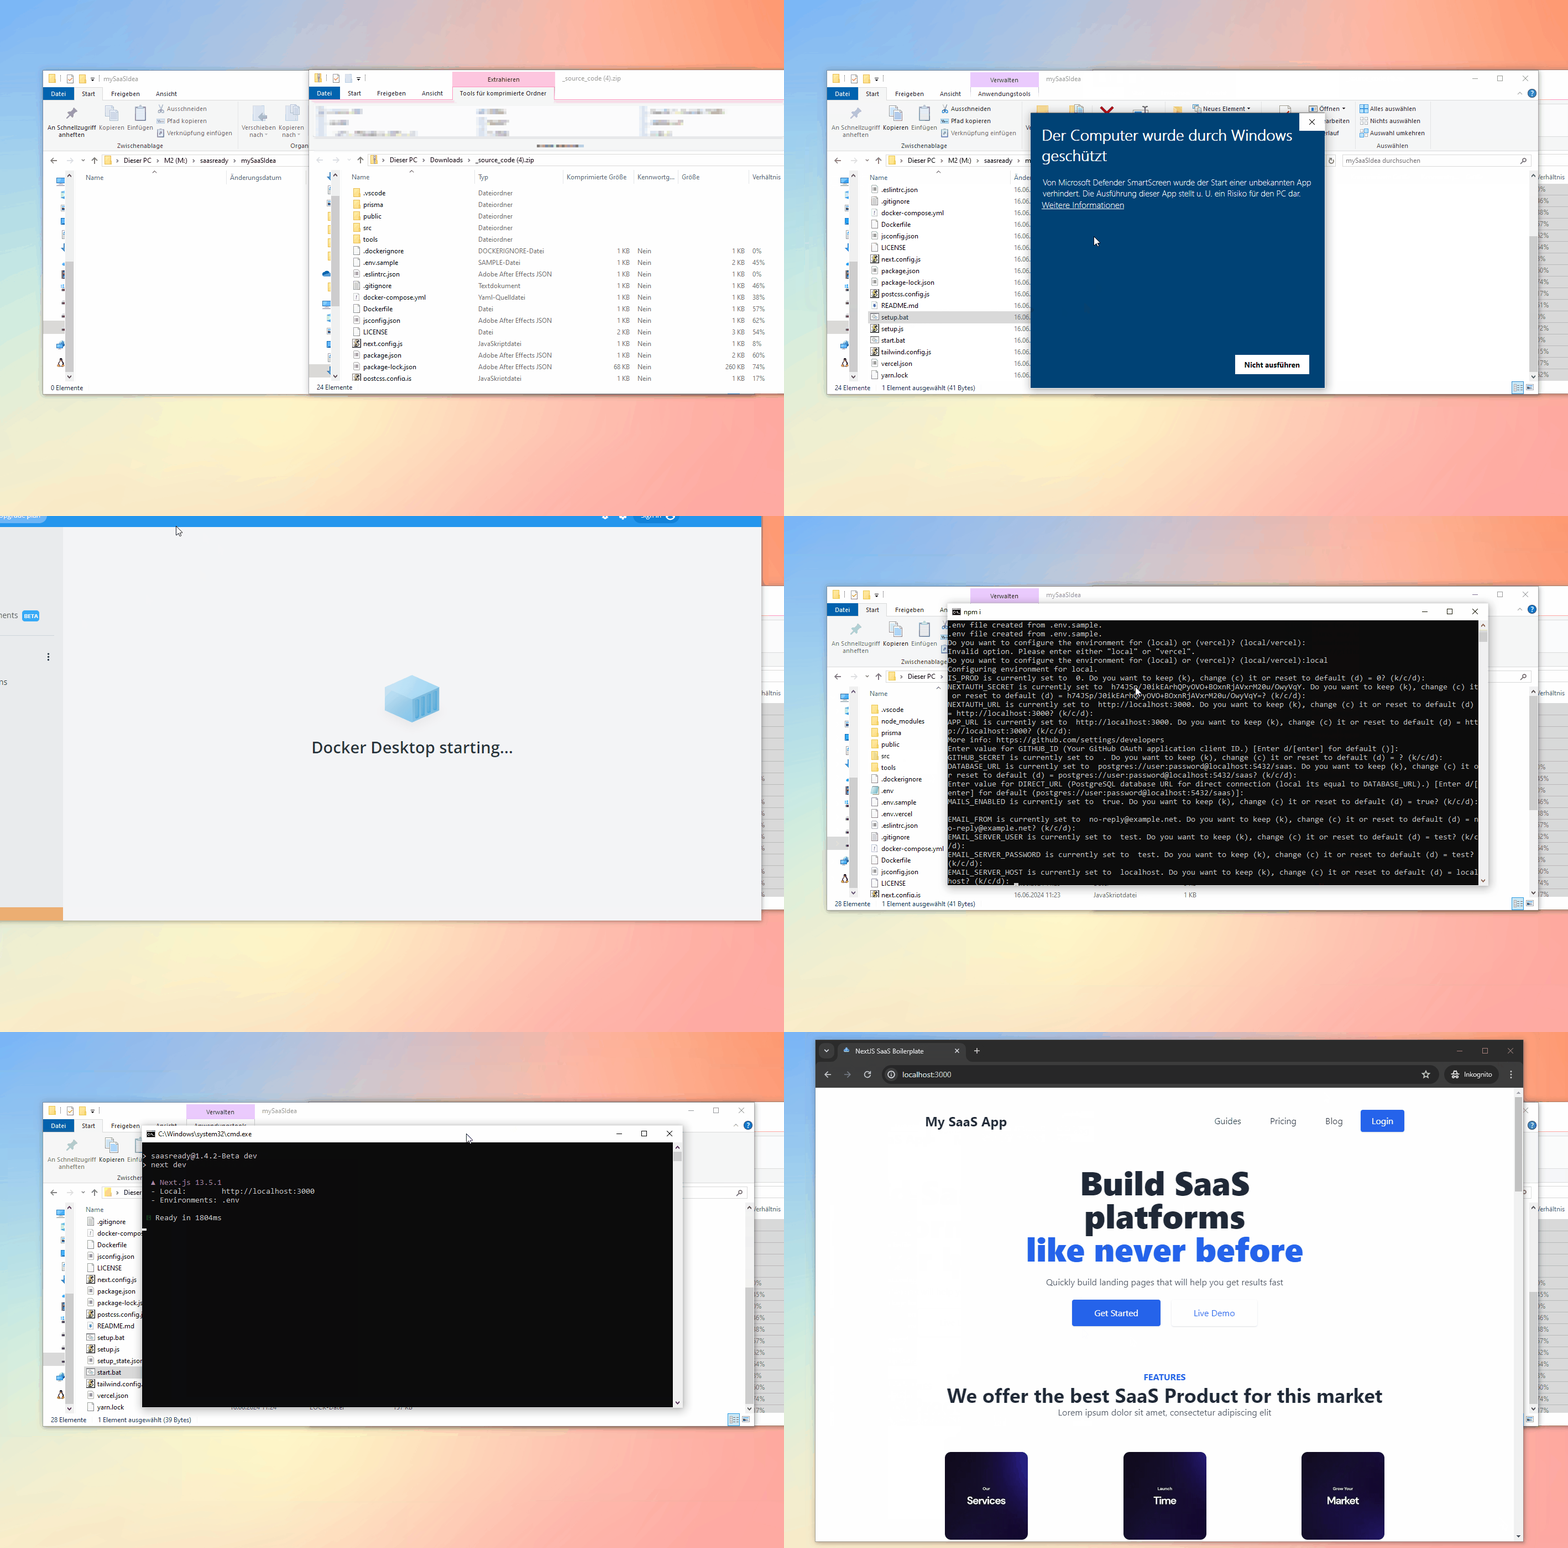
- To install via our setup cli please copy the template to a local folder and make sure you have docker running.
- Run the
setup.bator open a console and runnpm run setupin the folder - Complete the setup, choose (local) if you want the default settings (recommended) just press enter
- Start the instance via
start.bator runnpm run devin the folder, you can now accesshttp://localhost:3000
Done
You can now customize or deploy to vercel.
Manual Installation
Video format
Prerequisites
Before you begin, ensure you have the following installed on your system:
- Node.js
- Docker
- Visual Studio Code (VSCode)
Installing Node.js
Node.js is a JavaScript runtime built on Chrome's V8 JavaScript engine. You can download and install Node.js from the official website.
- Visit the Node.js download page.
- Download the LTS version for your operating system.
- Run the installer and follow the on-screen instructions.
To verify the installation, open a terminal and run:
node -v
Installing Docker
Docker is a platform that allows you to develop, ship, and run applications inside containers. You can download Docker from the official website.
- Visit the Docker download page.
- Download Docker Desktop for your operating system.
- Run the installer and follow the on-screen instructions.
- Start Docker Desktop.
To verify the installation, open a terminal and run:
docker --version
Installing Visual Studio Code (VSCode)
VSCode is a lightweight but powerful source code editor from Microsoft. You can download it from the official website.
- Visit the VSCode download page.
- Download the installer for your operating system.
- Run the installer and follow the on-screen instructions.
To verify the installation, open VSCode and ensure it launches correctly.
Running Docker-Compose
Docker Compose is a tool for defining and running multi-container Docker applications. In the root directory of your SaaSReady project, you should find a docker-compose.yml file. This file defines the services that make up your application.
To start the services defined in the docker-compose.yml file, open a terminal, navigate to the project directory, and run:
docker-compose up
This command will pull the necessary Docker images (if they are not already downloaded), create the containers, and start the services.
Configuring the Environment
The project contains a sample environment configuration file named .env.sample. You need to copy this file to .env and fill in the necessary values.
cp .env.sample .env
Explanation of .env Values
You can initially fill these values based on your local setup. For example:
IS_PROD = 0

NEXTAUTH_URL = http://localhost:3000
APP_URL = http://localhost:3000

# Generate using `openssl rand -base64 32` – Make sure to update this value right here
NEXTAUTH_SECRET = h74JSp/J0ikEArhQPyOVO+BOxnRjAVxrM20u/OwyVqY=

# Github auth configuration
GITHUB_ID =
GITHUB_SECRET =

# Database Configuration
DATABASE_URL = postgres://user:password@localhost:5432/saas
# DIRECT_URL = # Use only for cloud DBs (ie. Supabase)

# Email Configuration
MAILS_ENABLED = true
EMAIL_FROM = no-reply@example.net
EMAIL_SERVER_USER = test
EMAIL_SERVER_PASSWORD = test
EMAIL_SERVER_HOST = localhost
EMAIL_SERVER_PORT = 2525

# Payments Configuration (Stripe)
NEXT_PUBLIC_PAYMENTS_PUBLISHABLE_KEY =
PAYMENTS_SECRET_KE =
PAYMENTS_SIGNING_SECRET =

# Google Analytics
# NEXT_PUBLIC_GOOGLE_ANALYTICS_ID = # Get from Google Analytics - Universal Analytics `UA-XXXXXXXXX-X`

# Vercel API
NEXT_PUBLIC_VERCEL_IP_ADDRESS = 76.76.21.21
VERCEL_API_URL = https://api.vercel.com
# VERCEL_PROJECT_ID = # Get from Vercel project page
# VERCEL_AUTH_BEARER_TOKEN = # Get from Vercel personal account settings, tokens page
# VERCEL_TEAM_ID = # Get from Vercel team page (If deploying from a team)

ADMIN_EMAIL =

NEXT_PUBLIC_SAAS_NAME =
Running Database Migrations
After configuring the environment, you need to run database migrations to set up your database schema. In the project directory, run:
npm run migration
This command will apply all necessary migrations to your database.
Running and Debugging via VSCode
VSCode provides a built-in debugger that you can use to run and debug your application.
- Open your project in VSCode.
- Go to the Run and Debug view by clicking the play icon in the sidebar or pressing
Ctrl+Shift+D. - Click on "Run and Debug" to start the application.
VSCode will launch your application and attach the debugger.
Opening the Application
Once the application is running, you can access it in your web browser. Open your browser and navigate to:
http://localhost:3000
You should see the SaaSReady application running.
Congratulations! You have successfully set up and run the SaaSReady template on your local machine. Happy coding!